Making terrain for model train layout is the first process for developing model train scenery. You can include terrain not only mountains, valleys, cliffs, riverbeds, and gorges but also meadows, fields, undulating landscapes according to your imagination. There are many ways to develop terrain for model train layout.
Screen or chicken wire

This one is the older method but still, works and is fairly inexpensive for making terrain for model train layout. You can continue your work with some old screening materials or chicken wire or any other similar malleable material lying around the house.
It’s easier to work when you cut the material in sections. Then staple or glue the bottom edge to the sub-roadbed. The top edge should be folded under and attached to the wall or backdrop in such a way that the screen comes to a peak then begins dipping down behind itself before it’s attached. This way it won’t look like your trees are climbing your wall when you’re finished.
You can shape the screen in any way what you want. You can make an undulating meadow, irregular hills, and valleys, or tall mountains. You may have to be compelled to use items of wood or polystyrene or wadded up newspaper beneath the screen so as to prop it up firmly in some areas.
You need to make sure that no metal no metal parts of the screen or wire mesh come into contact with the rails of your track after you have finished fastening it down.
Now you need to take plaster cloth (it’s a gauze material coated with dry plaster and available at hobby shops) and cut several 6 or 8-inch lengths. Take one strip of the plaster textile and place it in a very flat pan of water for a couple of seconds, only enough time to soak the material. Then pull the material out of the water by holding it at a pair of corners and pull in out as a sheet. Then place the sheet of soaked plaster textile on the screen from beginning at the highest and canopy over a locality of the screen with the material. Then pull the material out of the water by holding it at a pair of corners and pull in out as a sheet. Then place the sheet of soaked plaster textile on the screen from beginning at the highest and canopy over a locality of the screen with the material.
You should apply a consecutive piece of plaster textile in a very similar fashion overlapping the primary sheet. Continue your work till you can’t see the screen or wire material any longer.
If you don’t have any plaster cloth, you can use regular paper towels soaked in a soupy mixture of plaster or Hydrocal (it’s a lighter form of plaster and you will get it from hobby stores).
If you don’t wish to use plaster, you’ll be able to use stiff paper towels and glue them on the surface of the screen. You’ll be able to additionally use a brush and an instrumentation of liquid glue.
Cardboard web strips
If you want to make terrain for model train layout using this method, you need first an old cardboard box and some heavy-duty scissors or a good box-cutter knife.
Now you need to cut many one-inch wide strips of cardboard in varying lengths depending on the size of your layout. And decide about the height of mountain you want.
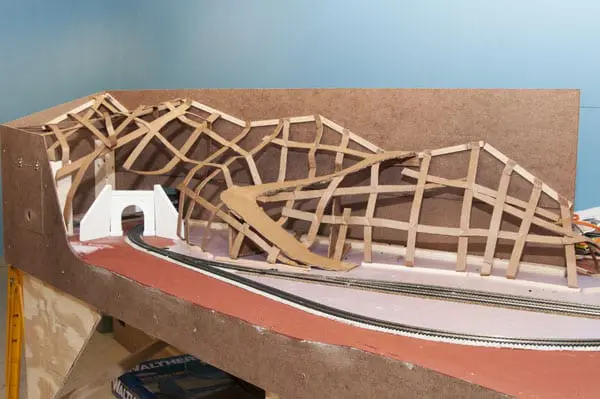
Now you need to start attaching the strips to the sub roadbed by folding the very bottom of the strip underneath itself and attaching the fold to the sub roadbed. Use the same technique on the top of the strip. Folding the top of the strip underneath and attaching the folded-under portion to the wall or backdrop.
Place the next strip about 1-2 inches to the side of the first and do the same thing.
After you get several strips in place, then take another length of cardboard strip and glue or staple it horizontally across the vertical strips. Keep doing this with many additional strips till you finish up with a lattice or net of cardboard strips. You’ll be able to modify the peak and form of this net in varied places to form the impact of mountains and valleys.
You can apply the plaster cloth or paper towels soaked with plaster after you have formed and shaped your lattice work.
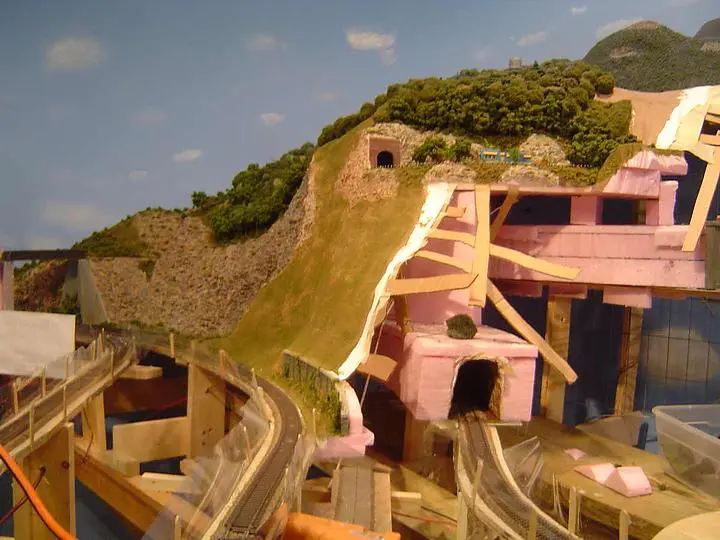
Wadded newspaper method for making model train scenery

This method is excellent for making terrain of model train layout. I got this from a Woodland Scenic’s book on model train scenery.
Collect some old newspaper and wad up them like one-half sheets at a time. To make each wad have a somewhat rounded top and irregular bottom. Then begin stacking these wads on prime of every different, holding them in situ with masking paper.

After you have stacked a few of the wads in the shape of a hill or mountain, you can then get out the plaster textile and lay sheets of the soaked textile on the surface of the mountain, layering them in order that none of the newspaper is visible beneath.

Here’s How To Installing Model Train Buildings and Roads
Resources: