These seven model train photos cover the full range of what serious modelers build: Märklin HO Alpine layouts with hand-cast plaster mountains, American HO road switchers on long steel canyon bridges, Z scale (1:220) village dioramas the size of a coffee table, and exhibition-grade British outline industrial scenes. Each photo below shows a different technique that translates directly to layouts you can build at home, whether you are still working through model railroad scenery basics or already running operating sessions on a permanent layout.
What separates great model railroad photography from average shots is rarely the camera. It is the layout underneath. Consistent scenery color palettes, era-correct rolling stock, painted backdrops that imply distance, and water effects that catch the light all show up clearly in still photography even when they are hard to notice in person. The seven photos below were picked because each one demonstrates at least one of those techniques at a high level.
What Makes a Model Train Photo Worth Studying
A photo of a great layout teaches you more than a track plan. The plan shows where the trains go. The photo shows whether the scenery, lighting, weathering, and color choices hold up at scale. When a model railroad photograph reads as believable at first glance, it usually means three things came together: the rock and ground colors stay in one earth-tone family, the trees and ground cover vary in height and shade instead of looking like a single product, and the rolling stock matches the era and prototype the scenery is suggesting.
The photos below come from multiple scales: HO, OO, and Z. They cover European Alpine, American Western canyon, German village, and British industrial themes. What ties them together is that each one was built by someone who decided on a place and an era before they ordered materials, and then stayed disciplined about it through the entire build.
1. Märklin HO Alpine Layout With Twin Stone Viaducts
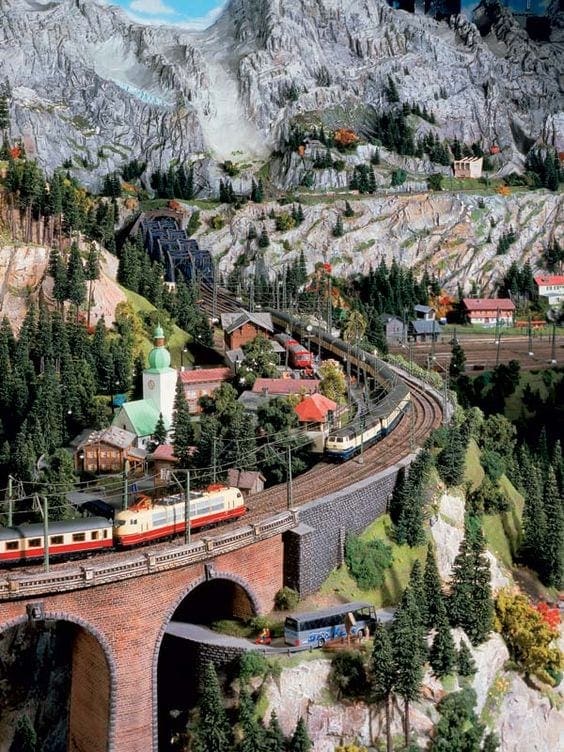
This is a Märklin HO Swiss Alpine scene, modeling roughly the SBB main line through the central Alps in the modern catenary era. The defining feature is the stacked geometry: a lower stone arch viaduct carrying a Re 4/4 electric and InterCity consist, a second viaduct above it with another modern Euro express, then the rock face climbing again to a truss bridge tucked onto a shelf high on the mountain.
The plaster mountain work is what makes the photo. The peaks are cast or carved hardshell with multiple gray and beige washes layered to suggest snow-streaked granite, then dry-brushed with white at the highest ridges. The conifers below the rockline are mixed heights and shades, not a single product. A flat green forest would have flattened the photo. The variation is what gives the mountain its scale.
2. HO American Freight on a Deep Canyon Truss Bridge
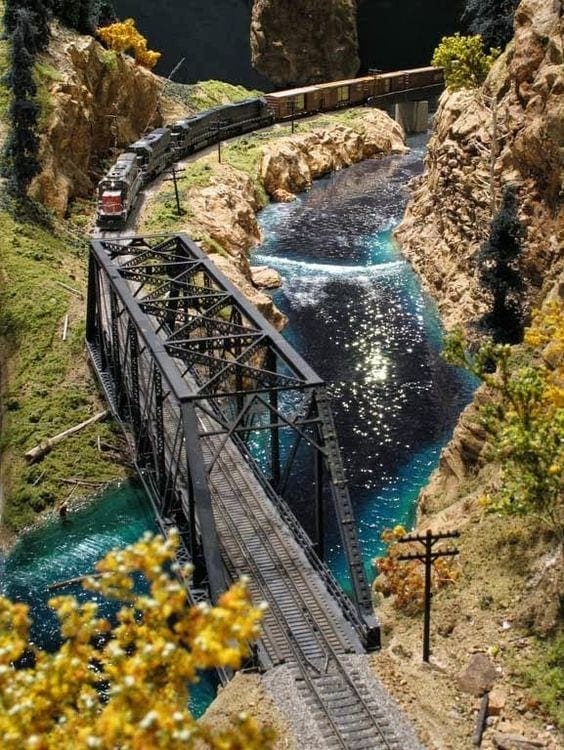
A pair of EMD road switchers leads a mixed freight onto a black steel deck-and-through truss bridge spanning a Rocky Mountain river canyon. The scene reads as a modern Class I railroad through the Colorado or Wyoming high country, probably Union Pacific or BNSF country in the autumn shoulder season.
The water effect is the technical showpiece here. The deep teal color comes from layered acrylic gloss medium tinted with multiple shades of green and blue, poured in stages and not all at once. The light ripples are not paint, they are physical waves built into the surface of the final gloss pour before it set. Anyone trying to replicate this on their own layout should pour water in three to five thin layers rather than one thick one, and tint each layer slightly differently to build the variation. The model railroad mountains guide on this site covers the canyon walls in detail.
3. Z Scale Multi-Level Helix Under Construction
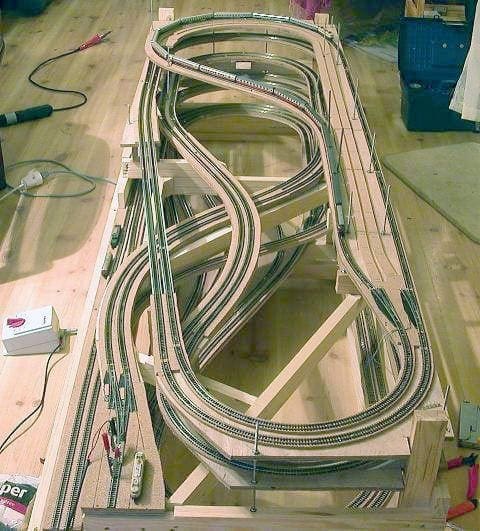
This is a Z scale (1:220) layout caught at the trackwork stage, with the multi-level helix and switching ladder ready for power testing before scenery goes in. Z scale is the smallest commercially supported gauge, which means a full mainline run with passing sidings and a hidden staging yard fits inside a benchwork footprint barely larger than a coffee table.
The construction sequence matters here. Track gets fully wired, tested, and signed off before any scenery work begins. Reaching into a finished mountain to fix a dead frog or a loose joiner is the single most common avoidable mistake on tight-space layouts. The alligator clips visible in the photo are connected to a test pack used to roll every locomotive through every turnout and grade before the scenery covers anything up. It is unglamorous work that pays back ten times over once the scenery is in.
4. Compact HO Tabletop Layout With Roundhouse and Twin Tunnels
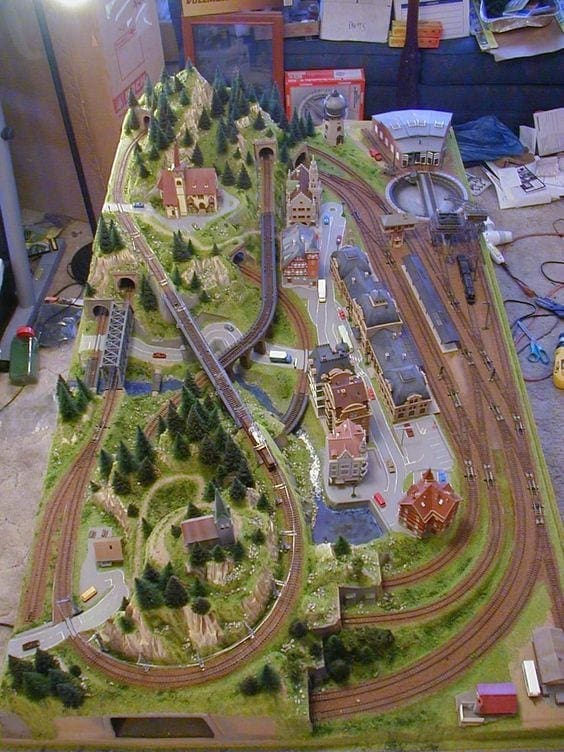
A compact tabletop HO layout that fits a working turntable, a small roundhouse, a town with an observatory dome, and twin curved tunnels through a forested ridge all inside what looks like a 4×6 or 4×8 footprint. The track plan is a folded double loop, which is one of the most efficient ways to fit continuous-run operation and visible staging into a small space.
The terrain work is the lesson here. The mountain ridge is shaped with carved foam and finished with plaster cloth, then drilled at two points for the curved tunnel portals. Going through the ridge in two places instead of one creates the illusion of much greater layout depth, because trains disappear and reappear in different locations. For anyone planning a small layout, this photo is worth studying for how much operational interest the builder packed into a single 4×8 sheet of plywood.
5. Z Scale German Village With Domed Pavilion and Steel Arch Bridge
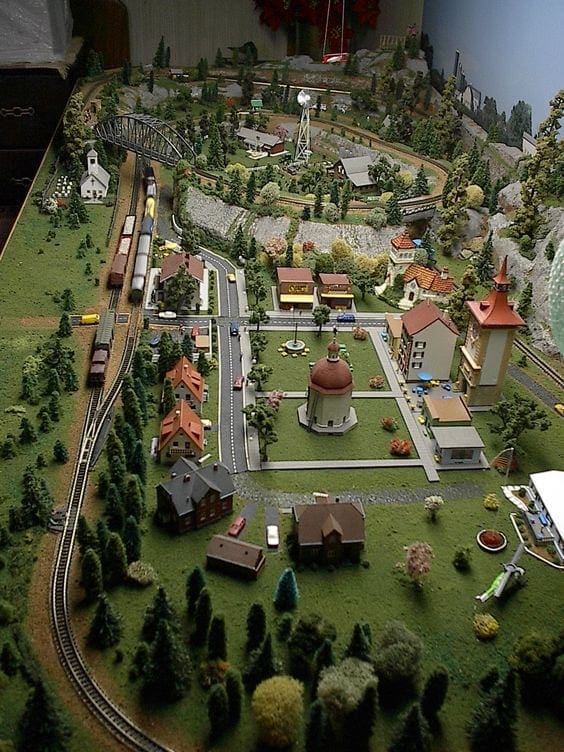
A Z scale (1:220) German village scene built into what looks like a 2×3 foot footprint. The white hilltop church on the left, the central town square with a domed rotunda, the windmill water tower, and the period freight train of tank and box cars on the curve all point to a small-town Bavarian setting circa 1950 to 1970.
The compositional discipline is the key. The village is built as a clearly defined town square in the center, with the church on the high ground at one end and the rural countryside fading to forested edges. It is a deliberate scene with a focal point, not a sprawl of unrelated buildings. On layouts this small, the temptation is to crowd in every Märklin or Faller kit you own. The discipline to leave open lawn between the structures is what makes this scene read as a real place rather than a model village display.
6. British Outline OO Industrial Yard With Hand Crane and Period Lorries
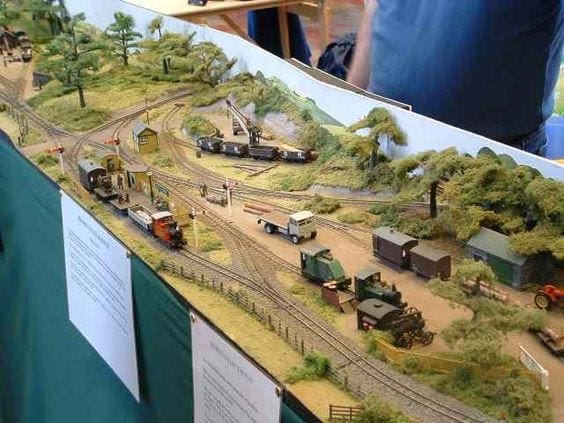
A British outline OO scale (1:76) exhibition diorama showing an interwar or early postwar industrial freight yard. The hand crane unloading a flat wagon, the small tank locomotive at the freight platform, the period lorries and the traction engine all date the scene to roughly 1930 to 1950. Exhibition modules like this one are usually built to a fixed size, typically 4 to 6 feet long, so that they can be transported to model railway shows and connected end to end with other exhibitors.
The painted hill backdrop deserves attention. It is a soft watercolor-style hill rendered in muted greens and grays, with no hard outlines and no attempt to compete with the foreground for detail. That intentional softness is what makes the backdrop disappear into perceived distance instead of looking like a flat wall behind the layout. Three to four hours of backdrop painting adds more depth to a small layout than any physical scenic addition you can buy. It is the cheapest meaningful upgrade available to anyone modeling at any scale.
7. HO Container Freight Curving Past Red Sandstone Cliffs
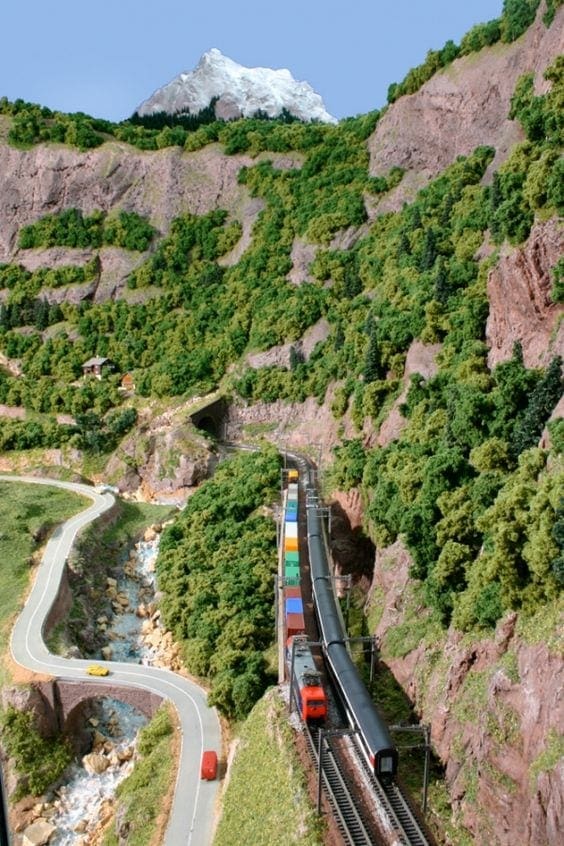
A modern HO intermodal container train curving around a red sandstone cliff face, with a single-track stone-portal tunnel in the middle distance and a snow-capped peak painted into the backdrop. The bright primary colors of the containers play against the warm red and ochre tones of the rock face, which is exactly the contrast that draws the eye through the photo.
The rock is the technical achievement. The cliff face uses red and burnt sienna washes over a textured plaster or hydrocal base, with the vegetation tucked into ledges and crevices in the formation. The trees and ground cover are darker greens in the lower half and lighter in the upper half, which mimics how real mountain vegetation thins out and changes color with altitude. The mountain stream switchback in the lower left adds a strong diagonal that pulls the eye from the foreground up to the train and on to the painted peak. Anyone planning a huge HO scale model railroad layout with a mountain section should study this composition for how it stages a single train against terrain that does most of the visual work.
Key Techniques to Take From These Photos
Pick one place and one era before you buy materials
Every photo above represents a single, identifiable place and time. Swiss main line in the catenary era. American Rocky Mountain freight in autumn. Bavarian village in the postwar decades. British industrial yard in the interwar period. None of these layouts mix eras or geographies. That single decision drives everything downstream: which rolling stock to buy, which scenery colors to use, which structures fit, and which to leave out.
Stay in one color family for terrain
The Alpine photos use cool grays and beiges. The Western canyon photo uses warm sandstone and aspen tones. The German village photo uses muted greens with red-tile roof accents. In every case the palette is narrow and consistent. A layout that mixes warm and cool terrain tones without geographic justification looks generic, no matter how good the individual pieces are.
Backdrops do half the work
Five of these seven photos depend heavily on a painted backdrop for their sense of depth. Distant mountains, softened hill profiles, sky gradients, and snow-capped peaks at the horizon are all backdrop work, not three-dimensional scenery. A flat blue painted sky makes even a well-built layout look unfinished, and any modeler who is not painting their backdrop is leaving the biggest single visual upgrade on the table.
Vary your trees and ground cover
None of these layouts use a single product for trees or ground cover. The Alpine forests mix at least four shades of green and three heights. The Western canyon uses yellow aspens against darker conifers for contrast. The German village fades from manicured town greenery to wilder forested edges. Buying one bag of Woodland Scenics blended turf and applying it everywhere is the most common mistake on otherwise well-built layouts.
Getting Started on Your Own Photo-Worthy Layout
You do not need a huge basement empire to build a layout that photographs as well as the ones above. Two of the seven photos in this gallery are Z scale layouts that fit on a tabletop. One is an HO compact layout under 4×8. A small layout with disciplined color choices, era-correct equipment, a painted backdrop, and varied scenery will out-photograph a large layout with generic scenery every time.
Start by picking the prototype and era you want to model. Pull a reference photo of the actual location, taped where you can see it from the workbench. Match your scenery colors, structure styles, and rolling stock to that single reference. Once the foundation is right, even a cell phone camera held at track level will produce photos worth keeping. Our guide on model railroad scenery for beginners walks through the materials and techniques used in most of the photos above.