HO scale is the most popular size in model railroading for a reason. The track and rolling stock are big enough that scenery, figures, and detail parts read clearly across the room, but small enough that you can fit a real layout in a spare bedroom, garage, or basement. If you have ever stood in front of a club layout and wondered which decisions made it look that good, this page breaks down five working layouts and what each one gets right.
Each layout below uses the same scale, but the choices are different. Some lean on mountain scenery and bridges, others on town buildings and freight operations, and one keeps the footprint tight enough to live on a single sheet of plywood. If you want deeper background on the visual side before you keep reading, our guides on scenery ideas for indoor layouts, painting rocks for the scenery foundation, and building model railroad mountains are worth bookmarking.
Why HO Scale Is the Default Choice for Most Layouts
HO runs at a ratio of 1:87, which is small enough to give you real running room on a 4×8 sheet of plywood and large enough that you can paint a figure, weather a freight car, or add brake details on a locomotive without a magnifying lamp. The track and turnouts are sold by every major brand, so replacement parts are easy and prices stay competitive.
The trade off is space. A serious HO layout with broad curves and a continuous main line wants a room of its own. Smaller scales like N can squeeze the same scenes into half the footprint, but you give up the visual weight that makes HO photos and videos read so well. The five layouts below show how builders solve that footprint question in different ways.
1. Mountain Pass Layout with Twin Bridges and a Two-Level Main
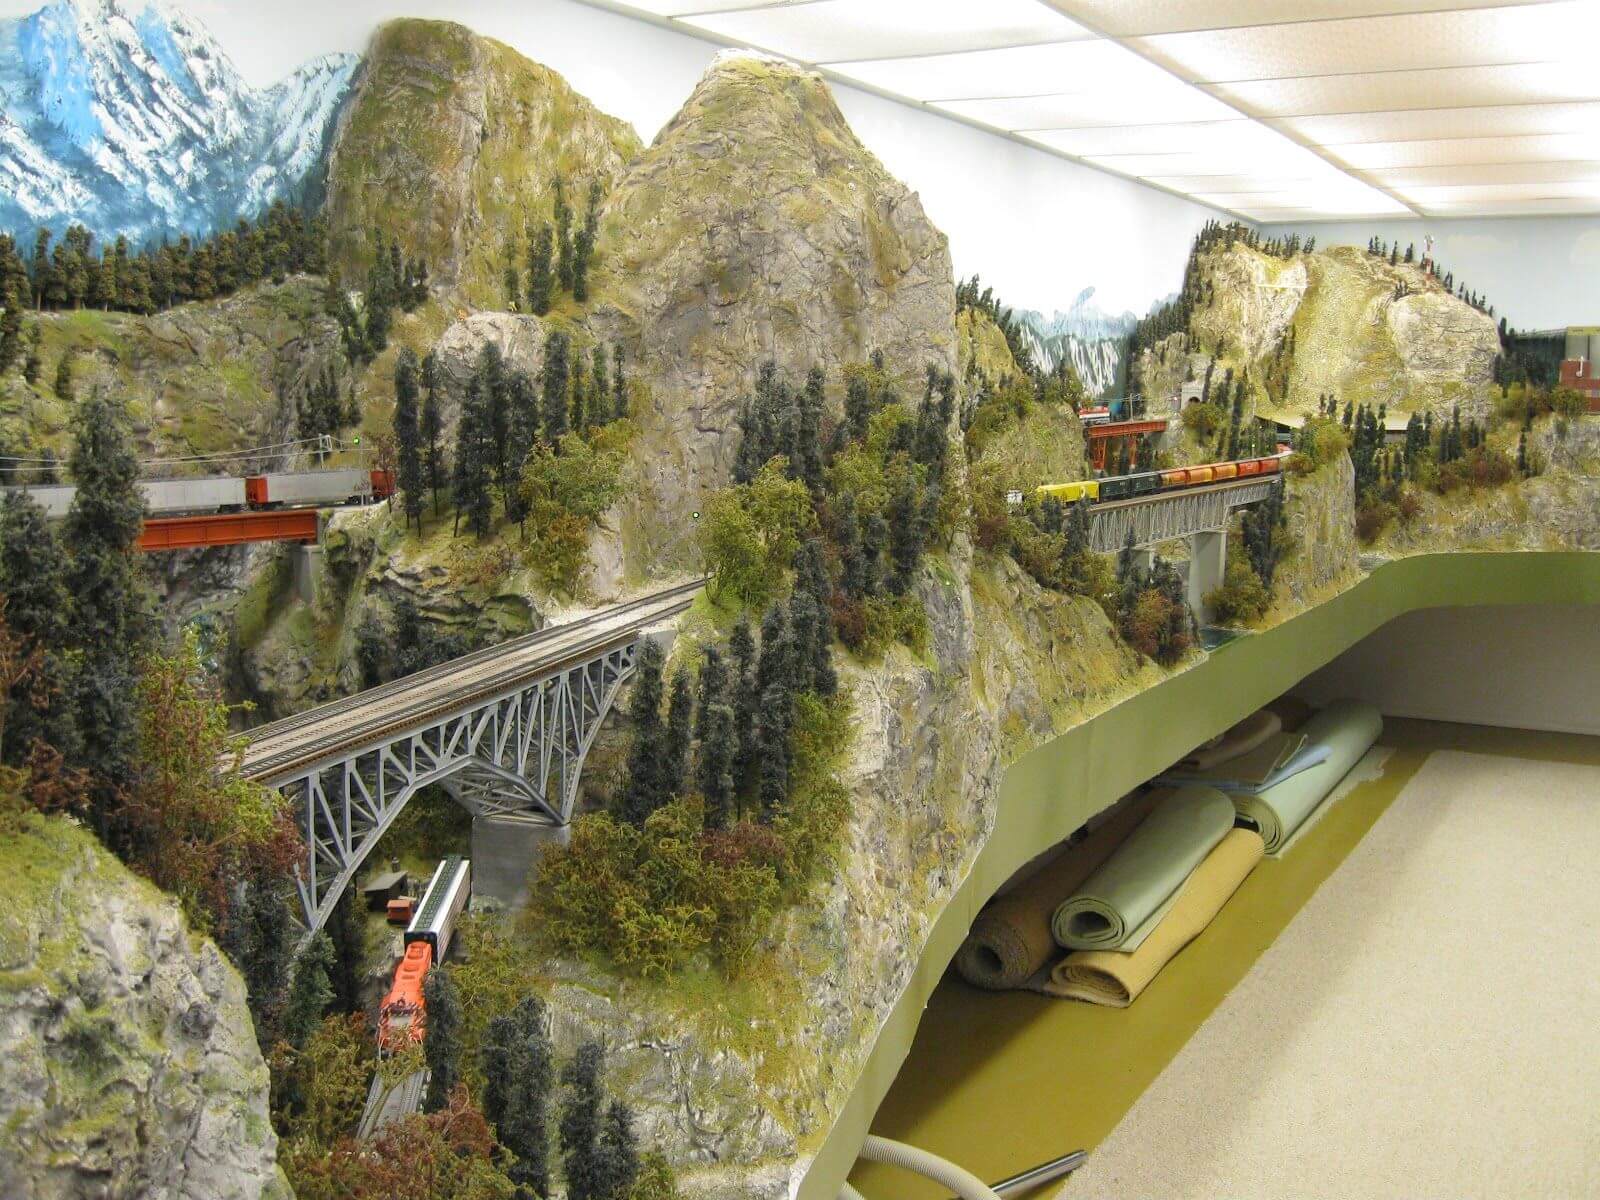
This is what HO does better than any other scale. The tall rock faces have enough surface area for real texture, the trees stack into layers that read like an actual forest, and the bridges feel substantial because the trains crossing them are large enough to see clearly from across the room.
Notice the two-level main line. The lower train crosses a deck truss bridge across a deep gorge while a second freight runs on the upper shelf to the right. That stacking trick is how you get long runs of mainline into a fixed footprint without the trains feeling like they are circling a coffee table.
The rolled up scenery mats stored under the layout edge tell you this is a working basement build, not a permanent showroom diorama. That is normal for HO at this size.
2. Steam Loco on a Wooden Trestle Above a River Canyon
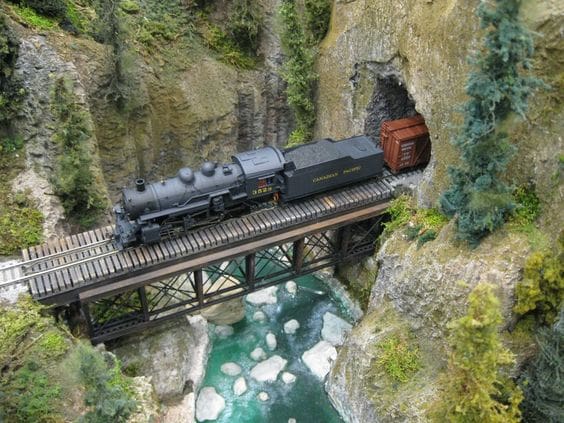
A single locomotive crossing a wooden trestle over a river canyon is one of the iconic HO shots, and this scene shows exactly why. The Canadian Pacific 2-8-2 has enough body length to look heavy on the bridge, the trestle bents read as separate timber pieces, and the rock walls feel like actual stone rather than poured plaster.
The turquoise water under the bridge is mostly clear epoxy or two part resin poured in layers, with the lighter color coming from white paint applied to the canyon floor before the pour. Small white rocks scatter across the river bed to break up the surface.
The tunnel portal carved into the right side rock wall is the kind of detail HO rewards. Stay with the scale and the entrance reads as a real opening in the mountain, not a hole in a cardboard box.
3. Rural Town Layout with Cattle, Warehouses, and a Working Crane
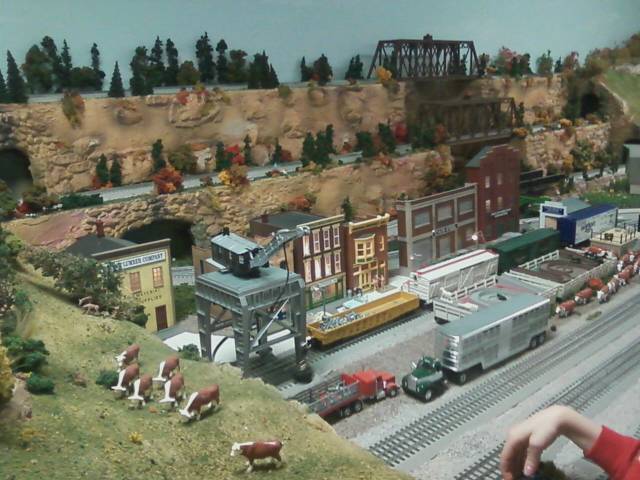
This is a different HO story. Instead of mountains and bridges, the focus here is on freight operations and a small town. The gantry crane is loading yellow box cars on the main siding, semi trucks are parked at the warehouse loading docks, and a cattle pasture sits in the foreground with hand painted cows grazing on the slope.
Layouts like this are easier to operate than scenic mountain runs. You can switch cars in and out of the yard, work the crane, swap trucks at the docks, and run a short freight up to the bridge in the background and back. That gives you something to do beyond watching trains loop.
The kraft paper hill base in the foreground with hand painted rocks underneath shows this is still a layout that gets built up one section at a time. The cows and figures are doing a lot of the storytelling work.
4. Compact Single-Table HO Layout with Two Oval Loops
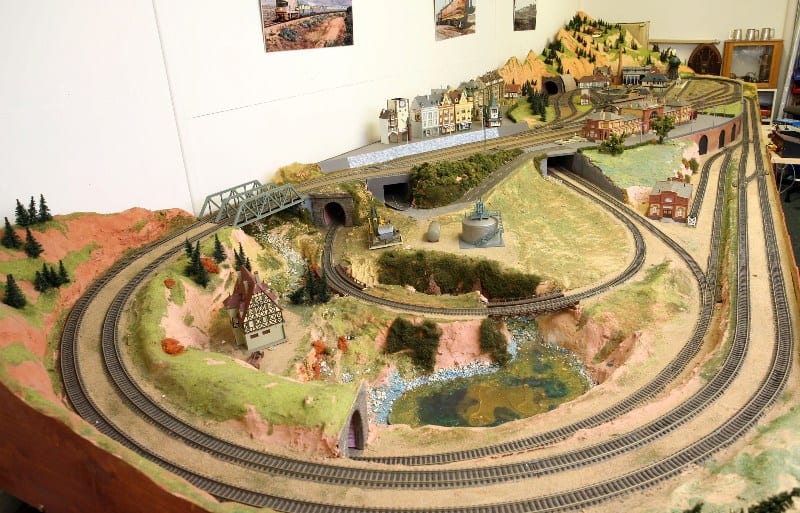
If you do not have a basement or dedicated room, this is the kind of HO build that fits. The whole thing sits on a single table top, with two oval loops, a small village on a hill, a girder bridge linking two sides, and a pond in the center of the lower oval.
Notice how the elevation change is handled. The upper level runs around the edge of the table with a hillside on the back wall, while the lower oval drops down into a sunken scene with the river and pond. That keeps the whole layout from looking flat without needing a multi level benchwork build.
The reference photos pinned on the wall behind the layout are a giveaway that the builder is working from real prototype scenes. That is one of the easiest ways to lift a small HO layout above hobby kit standard.
5. Marklin HO European Layout with Catenary and Half-Timber Buildings
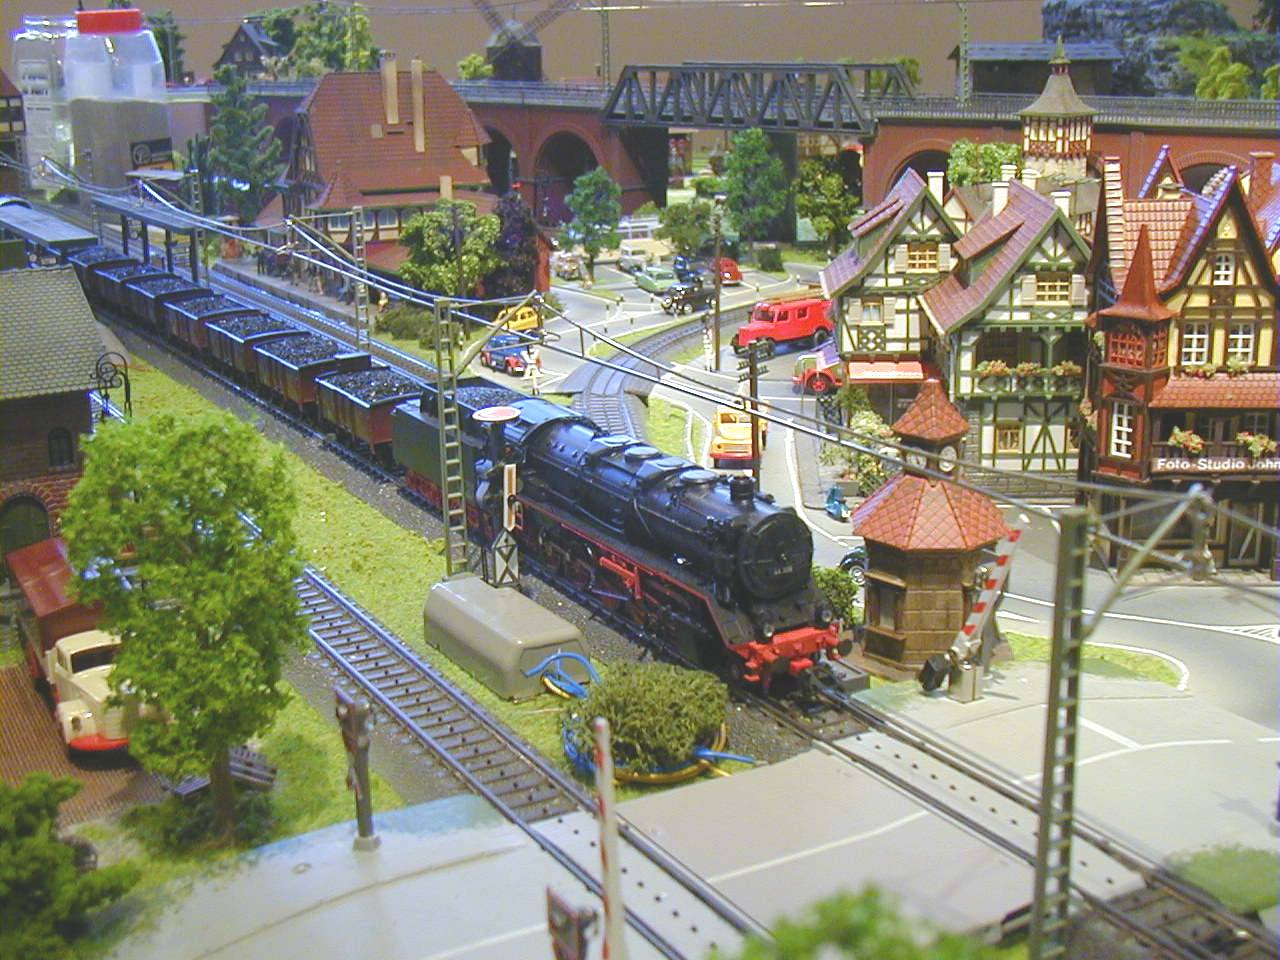
Marklin runs HO on three rail AC with overhead catenary, and the look is different enough from American HO that it is worth a separate item. The black 2-10-0 steam locomotive pulling a string of coal hoppers down the main street side of this layout has the heavy German look that Marklin is known for.
Pay attention to the catenary masts and overhead wires. Even when the locomotive is steam powered, the wires are usually live for electric service. That overhead system adds a visual element you simply do not get on most American HO builds, and it ties the whole scene to a specific time and place.
The half timber Bavarian buildings, signal house, and tile roofed station read as European in a way that scenery alone cannot do. If you like this look, the easiest entry point is a Marklin starter set rather than retrofitting American HO track with European structures.
Key Decisions That Separate a Great HO Layout from a Generic One
The five layouts above each get something specific right. If you are starting your own build or planning the next phase of an existing layout, these are the decisions that matter most.
Pick a Theme Before You Pick Track
A mountain layout, a rural town, and a European catenary build all use HO track, but the rolling stock, structures, and scenery materials are completely different. Decide what you want the layout to feel like before you spend money on track plans or kits.
Use Elevation to Create Length
Stacking a second main line above the first, dropping a scene into a sunken canyon, or running the back of the layout up a hillside all add visual length without adding floor space. The mountain pass and compact table layouts both lean on this trick.
Plan One Standout Scene
Every layout above has one centerpiece. The trestle over the canyon, the gantry crane in the freight yard, the catenary over the Bavarian village. Pick one scene to spend disproportionate time on and let the rest of the layout support it.
Match Operations to How You Actually Run
If you mostly want to watch trains, build for continuous running with broad curves and long sight lines. If you want to switch cars, build a yard and industries you can serve. The town layout above is set up for switching, the mountain pass for running.
Getting Started on Your Own HO Scale Layout
Start with a 4×8 sheet of plywood and one oval of code 83 track if this is your first build. The standard HO starter footprint gives you room to practice scenery techniques, learn how turnouts and wiring work, and figure out what kind of theme you actually enjoy before you commit to a basement sized project.
Spend the first month on track, the second month on basic scenery (ground cover, hills, a few trees), and the third month adding buildings and details. By month four you will have something that looks like the layouts above in miniature, and you will know exactly what you want to do next.